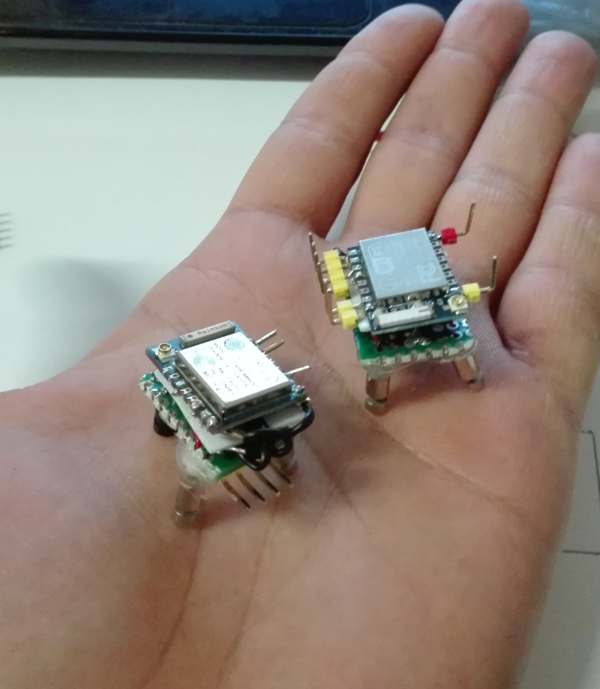
Mini Robot Swarm
 Repository created: 2017-03-13T19:58:40Z Update: 2017-03-14T12:29:54Z Push:2017-03-13T20:03:17Z
★4⚑Arduino☋ 1
A simple guide for create mini robot with ESP-07(ESP8266)
Below the simple steps to build a micro robot with ESP-07 and the control software with openFrameworks.
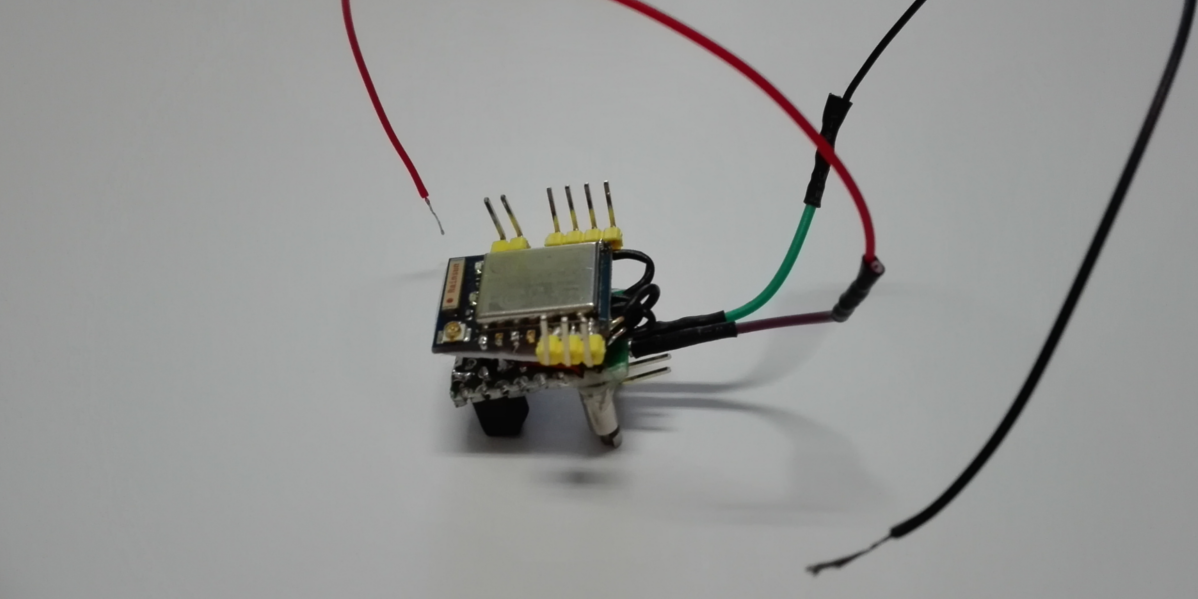
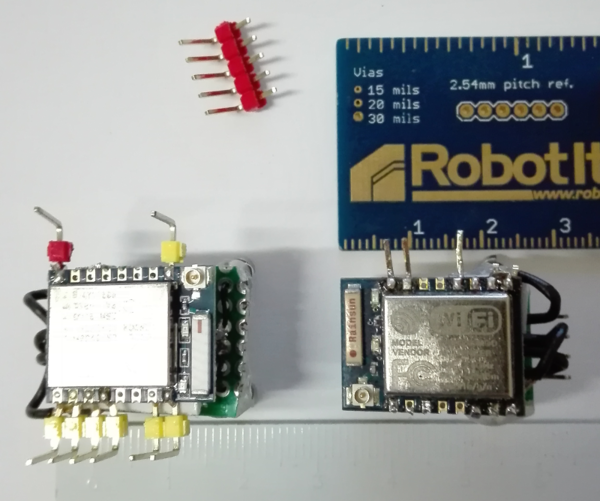
The components for this project are:
- 2222A Transistor
- Power Diode
- DC Motor for Vibration SmartPhone
- ESP8266 version ESP-07
- USB FTDI 3.3v
- Cable / PCB
The first step is Programming ESP-07 with new firmware(build with arduino code)
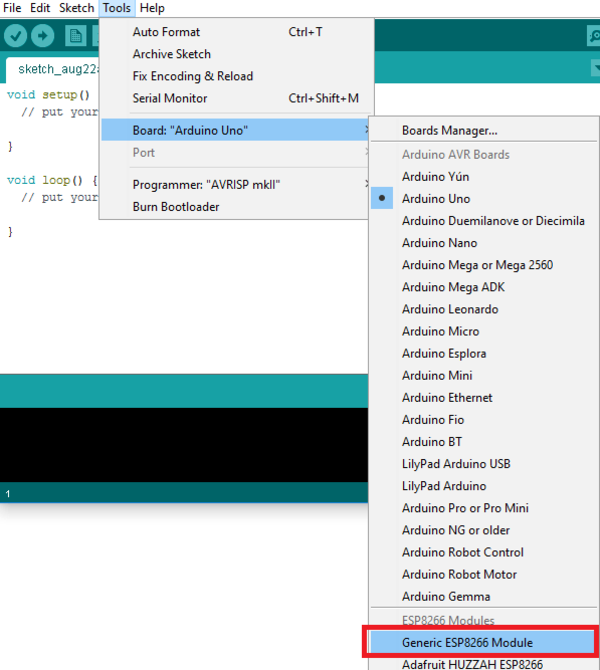
For the configuration IDE Arduino with code ESP8266, Follow these steps:
1) Arduino IDE, File -> Preference -> add this:
http://arduino.esp8266.com/stable/package_esp8266com_index.json
after configuration, go to: Tools -> Boards -> Boards Manager and install esp8266
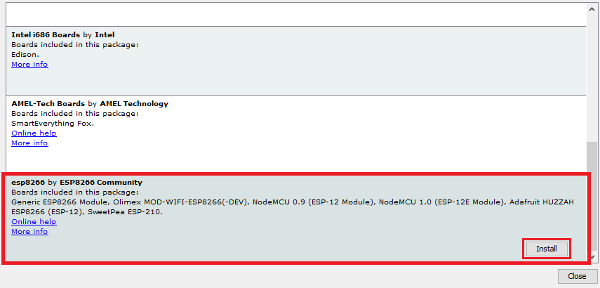
after installation, select the generic board ESP8266: Tools -> Boards
below is an example Server TCP working with pin GPIO12 GPIO13 to control switching on and off motors.
#include "ESP8266WiFi.h"

/* #define HTTP */

const char* ssid     = "***************";
const char* password = "***************";
int pinLeft          = 13;
int pinRight         = 12;
bool ValLeft         = false;
bool ValRight        = false;

WiFiServer server(9055);

void setup()
{
  Serial.begin(115200);
  delay(100);
  pinMode(pinLeft, OUTPUT);
  pinMode(pinRight, OUTPUT);
  digitalWrite(pinLeft, 0);
  digitalWrite(pinRight, 0);
  WiFi.begin(ssid, password);
  Serial.print("Wait.");
  while (WiFi.status() != WL_CONNECTED) {
    delay(500);
    Serial.print(".");
  }
  server.begin();
  String addr = WiFi.localIP().toString();
  Serial.println("");
  Serial.print("Connected, address: ");
  Serial.println(addr);
}

void loop() {
  WiFiClient client = server.available();
  if (!client) {
    return;
  }
  while (!client.available())
  {
    delay(1);
  }

  String req = client.readStringUntil('\r');
  client.flush();
  #ifdef HTTP
  if (req.indexOf("/gpio13") != -1)
  #else
  if (req.indexOf("gpio13") != -1)
  #endif
  {
    ValLeft  = !ValLeft;
    digitalWrite(pinLeft, (ValLeft) ? HIGH : LOW);
    #ifdef HTTP
      client.print("HTTP/1.1 200 OK\r\nContent-Type: text/html\r\n\r\n");
    #endif
    client.print("13:");
    client.println(ValLeft);
    Serial.print("GPIO13 state:");
    Serial.println((ValLeft) ? "HIGH" : "LOW");
    client.stop();
  }
  #ifdef HTTP
  else if (req.indexOf("/gpio12") != -1)
  #else
  else if (req.indexOf("gpio12") != -1)
  #endif
  {
    ValRight = !ValRight;
    digitalWrite(pinRight, (ValRight) ? HIGH : LOW);
    #ifdef HTTP
      client.print("HTTP/1.1 200 OK\r\nContent-Type: text/html\r\n\r\n");
    #endif
    client.print("12:");
    client.println(ValRight);
    Serial.print("GPIO12 state:");
    Serial.println((ValRight) ? "HIGH" : "LOW");
    client.stop();
  }
  else {
    String addr = WiFi.localIP().toString();
    Serial.print("I am:");
    Serial.println(addr);
    #ifdef HTTP
      client.print("HTTP/1.1 200 OK\r\nContent-Type: text/html\r\n\r\n");
    #endif
    client.println(addr);
    client.stop();
    return;
  }
  client.flush();
  delay(1);
}
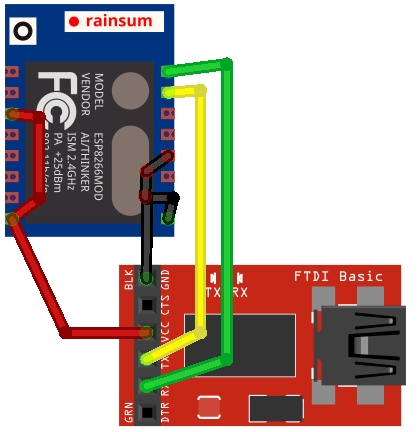
This scheme showing the mode programming for ESP-07
(make sure you put the pin in GPIO0 pull down to activate the programming mode)
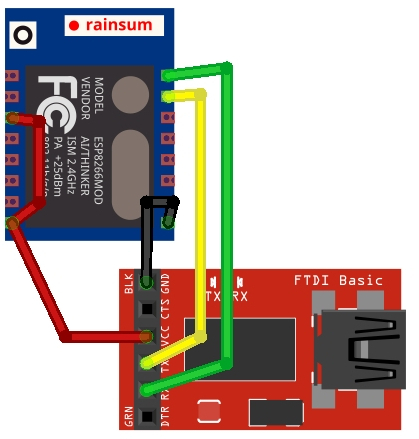
To verify the correct operation of the sketch,remove the power and remove the pin GPIO0 from GND switch on again and check connection wifi with serial monitor of Arduino IDE
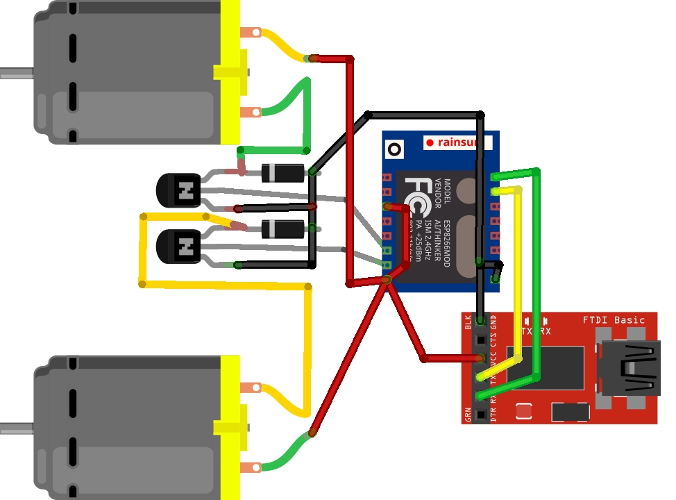
Established the proper functioning of the sketch, we pass to the construction of the engine board, scheme:
To end the communication and control testing here is a small script openFrameworks where we use ofxNetwork for communication with the TCP socket.

#include "ofMain.h"
#include "ofAppNoWindow.h"
#include "ofxNetwork.h"

/* #define HTTP */
#define PORT 9055 /* TCPServer example for ESP */

class ofApp : public ofBaseApp
{
	public:
		#ifdef HTTP
			ofURLFileLoader http;
		#else
			ofxTCPClient tcp;
		#endif
		string url,mode;

		ofApp(string _u, string _m)
		{
			url  = _u;
			mode = _m;
		}

		void setup()
		{
			#ifdef HTTP
				ofHttpResponse r = ofLoadURL("http://"+url+"/"+mode);
				cout << r.data << endl;
			#else
				tcp.setup(url,PORT);
			        tcp.setMessageDelimiter("\n");
				if(tcp.isConnected())
				{
				        tcp.send(mode);
				        while( 1 )
					{
	        				string str = tcp.receive();
						if(str.length() > 0)
						{
							tcp.close();
				                        ofLog()<< str;
							abort();
						}
						ofSleepMillis(1);
				        }
				}
			#endif
			ofExit(0);
		}
};

int main(int argc, char *argv[])
{
	ofAppNoWindow w;
	ofSetupOpenGL(&w,0,0, OF_WINDOW);
	if(argc > 2)
	{
		ofRunApp( new ofApp(argv[1], argv[2]) );
	}
	else
	{
		cout<<"Parameter: [ address ] [ pin ]\n";
		cout<<"\tExample: ./bin/esp-07 192.168.1.10 gpio13\n";
		ofExit(0);
	}
}
The control of robots with script openframeworks is very simple, the example does not open the a window, but use in command line mode, just do:
./bin/MiniBotESP07 ip-address gpio-number

// first time for GPIO12 pin in HIGH
./bin/MiniBotESP07 192.168.1.10 gpio12

// second time for GPIO12 pin in LOW
./bin/MiniBotESP07 192.168.1.10 gpio12

- Source:Github